 by Mike Brooks |
Last Updated: March 3, 2022
by Mike Brooks |
Last Updated: March 3, 2022 The technology of 3D printing has become increasingly popular worldwide. Large industrial enterprises, small companies, and individuals have all embraced this technology.
As an Amazon Associate, I earn from qualifying purchases. If you make a purchase after clicking on a link I may earn a small commission at no extra cost to you.
While the 3D top surfaces are typically rough, every user of this expertise endeavors to smooth these surfaces.
Are you wondering how to improve the quality of their parts? You are in the right place.
Quick Navigation
This article provides details on how to smooth your prints using the “ironing” technique.
What Is Surface Ironing 3D Printing? (3D Printing Ironing)
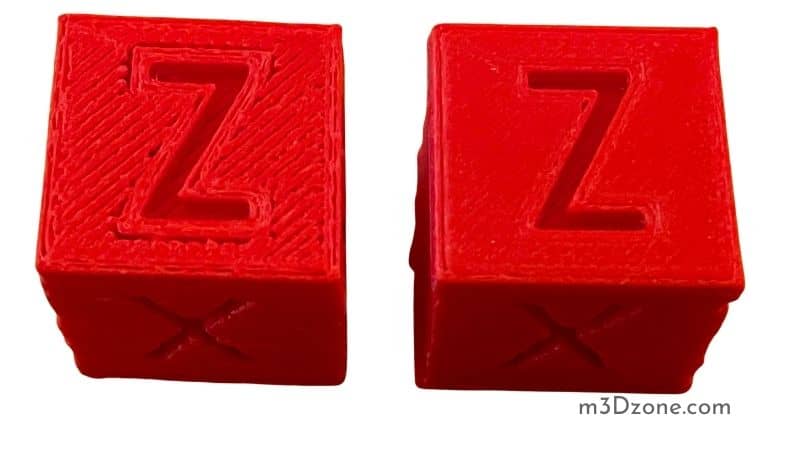
Smoothing 3D printing by ironing involves using heat on flat surfaces. You can achieve this on a 3D printer where you move the heated nozzle back and forth on your prints’ top surfaces.
The friction force causes any sticking materials to melt and pushes the heated nozzle over the prints to force the material back into the top of the print.
In addition, ironing, in this case, extrudes a small amount of material. As a result, the extra extrusion fills any remaining gaps on the top layer, smoothing the flat surfaces even more.
However, it is essential to note that over-extrusion can harm your prints. Only a small extrusion quantity is utilized when ironing to avoid such instances.
When Do You Employ Ironing?
Ironing produces the best results on flat top surface prints. These models include logos, nameplates, boxes, badges, lids, and more. It is also applicable when gluing two parts. Ironing minimizes the gap between the two by flattening their surfaces.
However, there are cases where ironing does not apply. These include organic shapes, figures, and uneven areas.
During the printing of such models, ironing has a significant negative effect; it increases the print time unnecessarily. In short, ironing has insignificant to no effect on uneven surfaces.
What Does Ironing in Cura Do?
Cura is an open-source 3D slicer that turns 3D models into 3D printable G-codes. It contains a significant number of adjustable features and settings that give full management of your part. You can fine-tune some print aspects and manage the printing process.
One of these new features is ironing. It gives your 3D top layers a super smooth surface, ideal for printing visually appealing models like artwork.
Additionally, ironing eases painting as the paint can stick better on flat surfaces. Cura developers have been increasing the ironing features and settings in their software to increase the user’s control over the process.
Cura Ironing Settings
The various ironing settings include ironing flow rate, iron only highest layer, ironing pattern, and ironing line spacing. Each of them controls different ironing elements.
How Does Ironing Flow Rate Work?
Among the various ironing settings that control the effect of your ironing is the ironing flow rate. Flow rate is responsible for setting the percentage of extrusion from the nozzle during ironing. The default settings are usually 15%.
You should keep this value low as only a small amount of the material is required to fill gaps and consequently flatten the top layers. The ironing percentage in Cura is set as 10%, but it is adjustable if you need to for better results.
What Do the Other Cura Ironing Settings Do?
Iron only highest layer – informs the printer to only iron the topmost layer of your print surface. For instance, if you are ironing multiple stairs, smoothing will apply to the uppermost stair alone.
Ironing inset – regulates the space between the edges of the flat top surfaces and the beginning of the nozzle’s ironing. Ironing will occur on the entire top layer if you do not distance the two. As a result, you have uneven edges. Therefore, it is advisable to have some space but keep it small.
Ironing pattern – organizes the nozzle’s ironing pattern on the top layer of your print. Although the exercise is theoretically unproven, there is a high likelihood for you to see the pattern to some extent. This setting provided concentric and zigzag options.
Ironing speed – manages the speed at which the nozzle moves on the top layer of your print when ironing. It is recommended to maintain a slow speed for ideal results. However, the process is a bit slow.
Ironing line spacing – regulates the space between nozzle passes during print ironing. Usually, the nozzle has small separation ironing lines and can level beyond the normal printing pass. Increased separation reduces print time but produces substandard results.
How Do I Make My Surface 3D Print Smooth?
Below are various methods of smoothing your 3D print surface:
1. Primer and Polyurethane Combination
To print a model with clear layer lines, you need spray paint and fast-drying polyurethane (check at Amazon). The paint should be able to bond well with plastics.
This smoothing technique is straightforward and non-labor intensive. Get your 3D printed model clean to avoid unwanted items remaining on the final model.
Spray your 3D print with a layer of your preferred paint and immediately top it up with a Polyurethane layer.
Finally, put your coated 3D print under a fan to prevent dripping and enable faster drying. At this point, the paint blends well with Polyurethane, filling any unexpected flaws and holes.
2. XTC-3D Technique
The clear 2-part epoxy resin XTC-3D helps in smoothing and sealing your 3D prints. You have to mix the two provided chemicals by following the given instruction. Brush the combination on your printed part and allow it to dry. It produces a soft, clear, and shiny coating on your model.
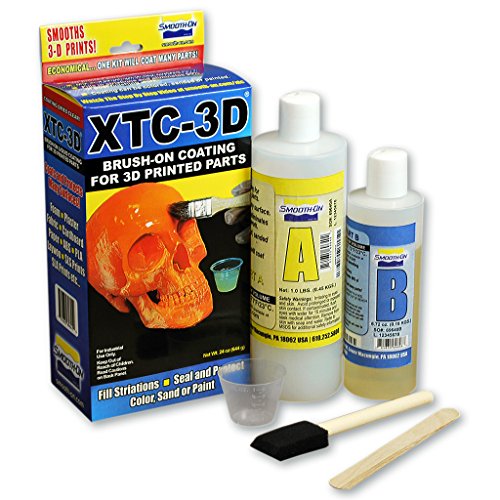
You can also mix your XTC-3D with coloring, tints, or dyes and use it for smoothing, adding glitters, or metallic coating effects.
3. 3D Gloop
This glue is specifically formulated for 3D prints. The special glue is in different formulas to suit different types of plastics and serves multiple uses.
Among them is the bed adhesiveness, where it glues parts together, and above all, it produces excellent results in smoothing 3D prints.
Use a brush to apply your 3D Gloop on your print. Since it is in a single ready-to-use bottle, it requires no mixing. Therefore, it is ideal for applying on small surfaces and has minimal chances of spilling.
Be sure to have proper ventilation when coating your print because the formula includes some fairly toxic material.
4. Sanding
This method is the cheapest but a bit tiresome. To obtain the desired results, you have to consider a few things.
When sanding plastics, it is advisable to use wet sandpaper. Since it is water-proof, regularly deep the paper in water during sanding. That prevents the scrubbed particles from getting between the abrasive sandpaper grains and keeps you off the particles’ dust.
The sanding friction can also produce heat that softens or melts the plastic. Wetting your sandpaper prevents such occurrences by cooling the print surface.
Another thing you need to consider is the surface area of your print. When dealing with large surfaces, spread your sandpaper over a large area to distribute pressure and produce better results.
Do your first round with wet coarse grit sandpaper and then do a smooth finish with a fine one.
To avoid diffused grooves on print when sanding, use a circular movement strategy.
5. Polishing
Where you want to flatten your print by painting, you must sand it with 2000 to 4000 grits sandpaper (check at Amazon) about two to three times.
Alternatively, you can use a special plastic polish that smears fine grooves with material to level your surface. A polishing compound and an electric hand sander is the other smoothing option of the polishing technique.
6. Spray Filling
This smoothing technique is ideal for large models. Since it is a thick texture, you have to be very careful when using it.
Be sure to mix the spray thoroughly with the filler to allow proper mixing of all ingredients in your first time of use.
Although the number of passes depends on the surface’s roughness, one pass is enough. After the spray dries, you can sand the surface and finish with paint.
This method is great on plastics because it produces good adhesion between them and the paint. It is relatively straightforward to smooth your 3D models with paint or spray paint from a container.
Conclusion
Ironing is an excellent smoothing technique for your 3D prints. Its work is exceptional on models, such as logos and nameplates. The outcome is so classy that you might think it was printed on a build plate.
Even so, keep in mind that it is time-consuming and not all surfaces you can apply ironing on. Round objects and figures do not get along with this smoothing strategy. Therefore, you should not enable ironing settings all the time.

Recommended Reading
Best Room Temperature for 3D Printing Environment
What is the best room temperature for 3D printing? It's advisable to maintain a room temperature range of between 68°F to 77°F (20°C to 25°C).
Best 3D Printing Tools. 15 Things You Can Print and 15 Accessories You Need!
You need to know the best 3D printing tools and essential accessories for your 3D print work station. We can help you choosing the right and essential ones!
Is 3D Printing Hard to Learn?
Is 3D printing hard to learn? It can be overwhelming to beginners because most printers are delicate and meticulous. First of all, you will have to invest time.