 by Mike Brooks |
Last Updated: February 4, 2022
by Mike Brooks |
Last Updated: February 4, 2022 It’s not a guarantee when creating models with a 3D printer that all your prints will be as desired and of high quality.
The process is frustrating both for beginners and experts as there is no procedure to get the best prints at all times.
Quick Navigation
Creating Models With a 3D Printer
Frustratingly enough, the problem is only realized when the print is almost complete, and at that point, nothing much can be done.
What you have is a disheartening failed print with an uneven surface, wasted efforts, and filaments. With the problem identified, we looked further as to what is causing the problems and the appropriate solutions. See below!
What Is 3D Printing Pillowing?
When the first few layers of your 3D print come out with little bumps and holes, generally a rough top surface, the problem is referred to as 3D printing pillowing. Pillowing and warping are the most common type of issues that will affect your 3D print quality.
Pillowing is slightly affected by the type of filament or printer.
3D printing pillowing is caused similarly to warping, only that it only affects the top layer. The top layer tends to warp around the infill underneath, resulting in an uneven rough surface. Pillowing leaves the top surface of your 3D print having uneven bumps and holes.
Unlike warping, pillowing is frustrating, and the fact that it only shows up when your print is at completion makes it even more disappointing. This means nothing much can be done, including canceling the print when pillowing appears. 3D printing pillowing is a common issue and it can be avoided.
What Causes Pillowing on the Top Surface?
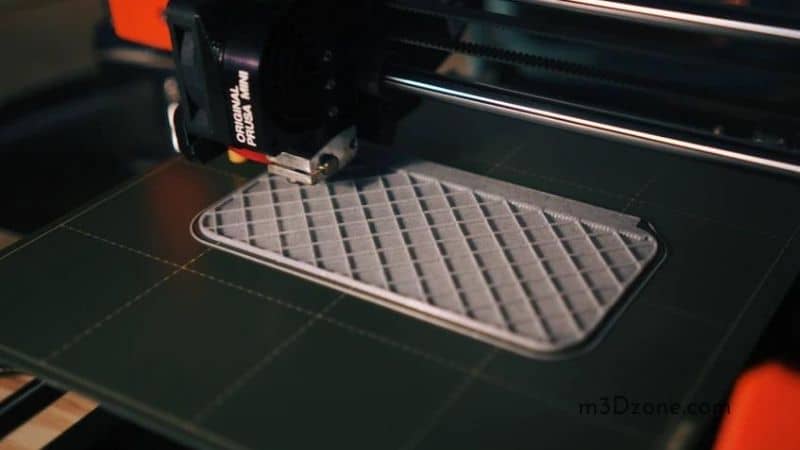
Pillowing usually occurs when the printer is finalizing on the top layer of your 3D print. Usually, infill material fills up the emptiness and spaces within your 3D print.
Depending on how strong you want your 3D print to be, the settings may be modified to none or full. None infills mean the larger the spaces there will be between support structures inside your 3D print.
The gaps between support structures may become too large, leading to the collapse of your 3D print roofing.
This leads to uneven bumps or holes on the surface of your print. Observing useful precautions ensures pillowing is prevented and reduces wastage of filaments on failed prints.
How to Fix 3D Print Pillowing
Let’s dive into some ways of fixing your 3D prints from pillowing.
-
Cool your print properly
Pillowing is usually caused by improper cooling. Cooling fans have to be in place and working while the top layers are printing. Your print should cool properly to avoid pillowing. A maximum fan speed and the correct position for maximum airflow towards your print are encouraged.
Adjusting the cooling settings is effective to ensure a proper cooling way to prevent the curling up of your print. Properly cooled solid layers tend not to be affected by pillowing.
-
Increase the layer height
Though pillowing is a result of improper cooling, it mainly affects the top thin layers, especially when the print has a thin layer height. With the affected top layer strengthened by adding more layers, it will be robust and strong and unlikely to collapse.
More top layers are the easiest way to fix pillowing and prevent warping as well, and the bottom layer is also thickened. The increased layer thickness helps curb thermal stress that is associated with filament cooling by providing greater mechanical resistance.
Increasing the size thickness in the slicer helps cover up any pillowing that might still occur and ensures it doesn’t appear in the next layer underneath. A thick layer seals the holes that would otherwise be visible in a thin layer after pillowing occurs.
The thickness can be adjusted in the ‘Advanced section settings,’ under ‘Thickness setting.’
-
Increase infill percentage
As described above, pillowing happens when the top layer of your print is not strong enough to sustain itself and instead collapses into the spaces left by infills. As the print cools, the top layer finds its way through the left spaces between the supports. This leads to the print having an uneven surface and not the desired surface you were after.
The recommended 12% of infill is workable with your print model. The figure is enough to occupy the gaps between the infill and should not cause trouble when printing.
If pillowing still occurs, it is advisable to adjust the infill percentage to close to 25% to be on the safe side. The gap spaces can be reduced by increasing infills, and this lowers the risks of billowing.
Using infills in a lower percentage means the spaces will enlarge for the filament to bridge without collapsing. infill lines should be spaced further apart to maintain the same infill percentage.
Increasing fill percentage is a relatively easier solution for fixing pillowing. Settings are easily adjusted within the slicer software but have their own shortcomings.
It increases the amount of filament required for your print and also extends the printing time. If you prioritized cost savings by using fewer filaments and high speed for your prints, this might not be your ideal solution.
-
Cut down the print speed
The irregular bumps and holes forming at the surface of your print are ugly and tend to destroy your print completely. Slowing down the printing speed when printing the top layer ensures there’s rapid cooling at the same time. With cooler temperatures, the top layer gets ample time to cool and stiffen, preventing it from crushing under its own weight.

This may lead to a poor layer adhesion but it being the top layer won’t affect the adhesion in any way. Care needs to be observed as you may end up jamming the print head before the printing process is complete. The printing speed should be in accordance with the changes in print temperature.
Which Filaments Are Prone to Pillowing?
Pillowing occurs irrespective of the filament used during the 3D printing, but there are others more susceptible to pillowing when printing. If you decide to use such filaments prone to pillowing, you may need to combine a few of the methods mentioned above to ensure a desirable top layer you were after.
Some of the filaments greatly affected by pillowing include:
High melting points filaments
Filaments have different melting points depending on their make. During printing, the temperature must reach the said temperature for a smooth deposit of molten filament on the print bed. Filaments that need a high temperature to melt tend to need a longer time to cool down and be rigid.
The steep temperature difference the filament goes through leaves the filament prone to warping and pillowing.
If you are working with filaments with high melting points, you should ensure the hot end temperature drops as the print completes the top layer.
This can be achieved by installing a cooling fan to lower the temperatures of the hot nozzle. The top layer filament should be able to cool down as quickly as possible to be able to occupy the spaces between the infills.
Soft filaments
The rigidity of the top layer determines whether your 3D print will have pillowing or not. Printing with soft filaments tends to act as a predisposing factor to pillowing as they are more likely to collapse.
Lowering the temperature alone may not be effective; hence it’s advisable that the gaps between the infills should be lowered to reduce chances of the filament caving.
Lowering the gaps between the print and support systems reduces the chances of pillowing occurring. You should increase the infill size to 25% for better results.
Conclusion
With no standard procedure or a specific set of instructions for producing quality 3D prints, printing can be frustrating at times. For new users, this will involve failed prints, endless adjustments to the printer’s settings, false starts, and countless manual settings of the parts.
There is no manual guide to this; getting to understand the cause of the problem will help you develop a solution. Pillowing is one of the common mishaps you’ll encounter in 3D printing, and you must get to avoid these before they occur.
You’ll only realize pillowing has occurred after your print is done, which is not economically friendly.

Recommended Reading
3D Printer Maintenance. The Ultimate Checklist!
3D printer maintenance services ensure that the printer runs well and performs as intended. No more failed prints and enhance the 3D prints quality.
3D Printer Calibration. How to Calibrate 3D Printers
Does your 3D printer calibration affect the print quality of the finished print? Check out our easy guide on how to correctly calibrate your 3D printers...
ABS vs Nylon in 3D Printing. What Is the Difference?
ABS vs Nylon in 3D printing: if you need durability, ABS is a good choice but if you need flexibility, go with Nylon. Let's find out more!