 by Mike Brooks |
Last Updated: May 2, 2022
by Mike Brooks |
Last Updated: May 2, 2022 PETG bridging is increasingly becoming popular in 3D printing but not without challenges that sometimes make printing messy.
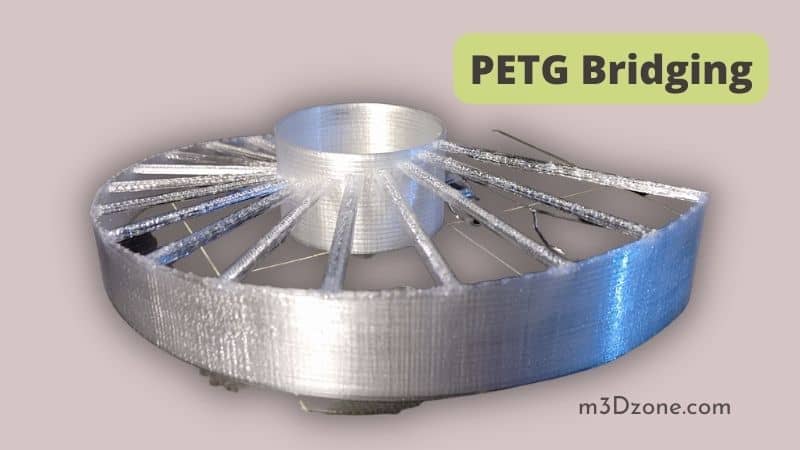
The most common bridging problem in PETG is deforming bridges by sagging from the bottom, creating unwanted loops.
Quick Navigation
What Is Bridging in 3D Printing?
Bridging is an extrusion of material between two raised areas of a printed object in 3D without support from below. It creates a kind of a bridge that we drive on from where the name is derived.
Bridging presents many challenges which are a result of poor bridging. Many factors such as improper extruder temperature, wrong print speed, and low cooling speed lead to bridging problems.
Although bridging problems are technical and hard to realize perfect bridges, the blame should largely fall on your failure to have the bridging settings right.
As the operator, your credibility in managing the parameters will solve the bridging issues and arrest the printing mess before it occurs.
This article will furnish you with rich information on the right bridging settings for your 3D printer and how to troubleshoot the bridging problem.
Is PETG Good at Bridging?
Your ability to manage the bridging and printing process will determine whether PETG is good at bridging. However, in definition, PETG (Polyethylene terephthalate glycol) produces better results in bridging.
That is because thermoplastic polyester has high durability, formability, and chemical resistance in manufacturing. So, we can say PETG is good at bridging.
PETG Bridging Issues
The bridging problem occurs when you are printing, and a part of the object you are printing has poor support from below. That bridging problem occurs because some filament threads are overhanging horizontally from the component.
Below is an outline of common issues that cause PETG bridging errors:
- The filament fails to solidify if you don’t give it enough cooling time
- You have the flow rate set at a very high printing speed
- You have selected the print speed too high
- You are using extremely high extruder temperatures to print
- Poor support while printing long bridges
How Do You Bridge in PETG?
Bridging in PETG may be complex and difficult to achieve perfect bridges, but you can manage the best quality print with enough practice and continuous improvement.
The following breakdown will guide you on how to bridge and achieve perfect bridges.
Optimum PETG Bridging Settings
To achieve the best quality results from your 3D printing, adjust the following bridging settings.
See That the Temperature Is Not Abnormally High
Abnormally high extruder temperature is the common reason PETG bridges droop. You may consider using a temperature tower since it helps determine the ideal temperature.
If your extruder temperature is set too high, cooling down of PETG will take time. Since the bridge does not have support beneath, the PETG will droop.
To avoid that bridging problem, you should decrease the print temperatures in line with the PETG brand that you are using.
You should set your temperature to at least 10 degrees Celsius below the actual recommendation. That will caution you from any excesses that may cause the PETG to overheat.
For example, regarding the above, if your PETG nozzle temperature is 230 degrees Celsius, you may consider setting your temperature at 220 degrees Celsius.
Related: Risks arising from 3D printer fumes
Print Speed/Bridging Speed
The bridging speed factor is far more complicated as too high or low speed presents a negative effect.
Bridging speed that is too high will cause problems with layer adhesion. That is because the high speed does not give them sufficient cooling down period.
On the other extreme, excessively low speed will cause drooping of the bridge as the filaments are not given enough time to extrude.
For the right bridging settings, set the bridging speed to at least 10mm/s above the standard printing speed recommended for your PETG.
Cooling Speed
Slow cooling will cause the PETG to remain molten for longer periods leading to their drooping. To handle the sagging problem, you should set the fan speed at 100%.
If you notice the problem of layer adhesion resulting from excessive cooling, start reducing the fan speed in 5% increments.
You should set and retain the cooling speed at the optimum speed where the problem of nozzle clogging and layer adhesion does not occur. That means you should maintain the cooling speed at the highest possible point so long as layer adhesion issues do not happen.
Flow Rate of Bridging Extrusion Multiplier
You should set the bridging extrusion multiplier at a default value of 100% and reduce it in 1% increments if over-extrusion occurs. Then you continue reducing at the rate of 1% until you fully control over-extrusion.
The flow rate of the extrusion multiplier is very sensitive, and if you wrongly set it, it will easily destroy the PETG Bridge.
Bridging Test. What Is a Bridging Test?
Testing the bridges is a necessary step to help you determine where you need to improve your bridging settings.
In bridging testing, you check all aspects that affect the print quality, such as temperature, extrusion multipliers flow rate, and cooling effect. PETG Bridging test will also help you learn how to fix bridging errors such as over-hangings and wet filaments.
In the process of the bridging test, you should train yourself on fixing PETG bridging issues. We have broken down the easy fixes to the common problems that users of PETG bridges face.
Easy Fixing of PETG Bridging Issues
The following are simplified recommendations on how you can easily fix printing problems.
See That Your Filaments Are Dry
The following are the signs that your filaments are wet:
- The extruder will start producing cracking or popping sounds.
- Once the melted filament leaves the nozzle, you will see bubbles randomly spread on it.
- You may notice the printout having rough edges, oozing, or stringing.
- You will notice a poor quality of surface and the layer adhesion of the printout.
- Once you notice the above signs, you should dry your filaments.
- See that you store your filaments in a room with humidity levels lower than 30%.
- Use a filament drier to dry your filaments.
- You may use an oven to dry your filaments. Set the temperature and wait for only a few hours.
- Food dehydrators are also an option for drying wet filaments. They are safer than ovens since the temperature range used in drying fruits is the same as the one used to dry your spool.
You should ensure that the temperatures are maintained within the glass transition temperature during the drying process.
Use Various Supports as a Foundation
Various supports will help stabilize the bridges as they connect with the build plate. That helps the bridges in having a foundation.
Bridges are normally hard to print because they lack a foundation compared to other printing parts that contact the build plate.
Using supports makes work easier. However, the disadvantage of using them is that contact with support makes surfaces rougher. You can help resolve this problem by increasing the gap between supports and print.
The other disadvantage is the extra workload of removing supports that slows you down.
Decrease the Flow Rate of the Bridging Extrusion Multiplier
Decreasing the flow rate will help stead the flow of filaments. That will prevent the excess flow of molten plastic from the nozzle, denying it enough cooling time.
The result will be a bridge that will look like solidified lava. It is recommended that you set the flow rate at 100% and reduce it in increments of 1% until you achieve the desired best quality.
Consider Making Layers Thin
Thin layers mean creating a bigger contact area and more layer adhesion by adjusting the layer height. The following are the benefits of thin layers.
- They will increase the strength and reduce voids.
- Thin layers will make printing more accurate, especially if you combine them with the right bridging angle.
- 3D printing is more effective with thin layers, especially when printing sharp angles.
Consider Minimizing Extruder Temperature
The effects of high extruder temperature will be watery hot filaments, damaged overhangs, and bridges. Lower temperatures reduce the adhesion and make the filaments more solid, producing quality results.
We have discussed the extruder temperature settings in the settings section above. You should beware that high extruder temperatures are common causes of poor print quality.
How Far Can You Bridge With a 3D Printer?
Although 3D PETG bridging is becoming popular worldwide, there are limitations to it that you need to know.
- 3D printer bridging has a restricted build size
- Copyright issues are common with 3D printing
- It happens to take away manufacturing jobs
There are some legal complications, for example, when printing firearms. Most 3D printers cannot produce complex gadgets due to the limitation of how many materials they can deposit at a time.
Conclusion
Although PETG Bridging is a complex concept, with effort, you will understand all the underlying elements that will make your printing journey enjoyable. Managing the settings and troubleshooting is a skill you must acquire with time.
Having just one wrongly configured parameter can be a recipe for many complications that compromise your print quality. However, it will make your 3D printing fun if you are patient.

Recommended Reading
Multi Color 3D Printing. Can It Be Done?
Multi color 3D printing is a challenge as typical 3d printing prints a single color despite the technology you deploy. Let's see what options do we have!
How to Start 3D Printing
There's more to beginning a 3D printing venture than getting the necessary materials. So, how to start 3D printing? Follow this useful guide and find out!
What Is PETG Filament? [Ultimate Guide]
What is PETG filament? When it comes to 3D printing, PETG is an acronym for Polyethylene Terephthalate (Glycol modified).