 by Mike Brooks |
Last Updated: March 6, 2022
by Mike Brooks |
Last Updated: March 6, 2022 When printing complex 3D materials, you can’t avoid a 3D printing overhang. Overhangs up to 45° can still be printed on 3D printers without losing the quality of the print material.
Printing overheads and bridges can be difficult for beginners, given that the constructions require great skills and experience.
3D printing overhangs is usually challenging mainly because of the factor that overhangs lack direct support on them.
What Is Overhang in 3D Printing?
Overhangs in 3D printing are geometric patterns in a 3D print model that extend outwards and past the previous layer. Overhangs lack direct support, which makes printing difficult.
However, there are 3D print overhangs that are tolerable such as print overhangs with 45° angle. If the overhang exceeds this limit, you may encounter such problems as dangling filament strands.
General Rule for 3D Print Overhang
When it comes to 3D printing, there is a general rule for overhangs. The overhang angle should not be more than 45° to ensure that each successive layer has adequate support on it. This also implies that at the 45° angle, the 3D print model is executed effectively since each layer is in around 50° contact with the layer underneath it.
Can 3D Printers Print Overhangs?
Most 3D printers won’t have any difficulties printing overhangs of 3.99 degrees.
Overhangs up to 45° can still be printed on 3D printers without losing the quality of the print material. The reason behind this is that any layer in a 45-degree overhang usually gets 50% of its support from the layer below.

Every successive layer has adequate support to remain solid to make the printing process possible.
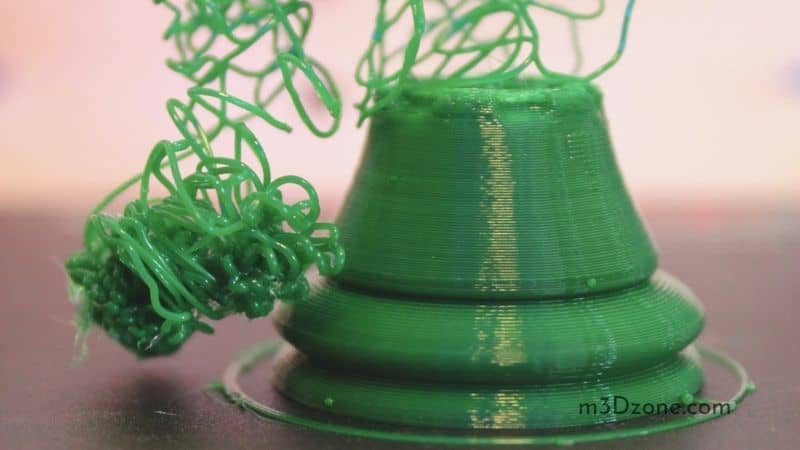
However, any angle extending beyond the 45-degree mark approaches the horizontal and makes printing difficult. Such overhangs are likely to cause delamination, sagging, curling, or collapsing. Going past 45° implies that every layer has less print material of the underneath layer to bond with. This eventually leads to poor-quality prints with unpleasant filament strands.
For this reason, most designers avoid overhangs beyond 45°. But for those designers who wouldn’t want to limit their ideas for the perfect design, the 45° mark is not often their best solution. Some objects require questionable overhangs to operate or maintain their efficiency.
How Do You Fix an Overhang on a 3D Printer?
You may know how to 3D print, why you want to 3D print, and even how to deal with slicing and scaling issues. But, your print has an overhang. Lacking any surface to pipe the print material onto, your model will curl and droop rather than shaping into the form you came up with.
Here are some common ways to deal with a 3D printing overhang;
Support Structures
A simple way to deal with bridges and overhangs is through the generation of supporting structures. These are pillars that originate from the ground to hold the sections that have difficulties holding themselves up.
Support structures come in different forms and patterns depending on the software used to generate them.
After finishing the print, you can rip out the supporting structures to leave the print model as intended.
Angle Deforming
This method deals with overheads by finding the overheads it can’t print and angling them down to be printed.
This technique takes away the struggle to undertake any activity after the printing process; no removal of supporting structures or adhering to finish. This method is a good idea when printing objects with overhangs on top of each other.
Slicing
Another great technique to fix an overhang in a 3D printer is slicing the model up and then adhering it back together. When the overheads are flattened, slicing at this point creates two similar objects that you can print flat on the ground.
How to Improve 3D Print Overhangs and Bridges
Ensuring that your 3D print models don’t have angles exceeding 45° is an excellent solution to overhangs. However, there are other ways to improve 3D print overhangs and bridges that you can implement in 3D printing:
-
Increase Fan Cooling Parts
One of the things you can do to improve your overhangs is to increase the efficiency of your layer cooling. This involves changing the fan for an advanced unit or using the fan duct, which helps direct cool air to the prints.
In some cases, the 3D prints will cool on one side while the other part is fighting overhangs since it does not have enough cooling. If this is the case, you can correct the situation easily. Fans and cooling work so well because immediately after the material is extruded via the nozzle, it cools to a temperature below its melting temperature, leaving it to harden.
The hardening of the filament as it’s exuded implies that it can build a great foundation despite the little support underneath. This also applies to bridges, which are extruded material lines between the two raised parts.
-
Reduce Layer Height
Another thing you can do is to reduce the layer height. This method improves 3D print overhangs and bridges because it decreases the angle at which extruded layers work.
Compare your extruded layers to a staircase; the bigger the stairs, the more material is off the edge of the layer below, which is the overhang.
On the other hand, a small staircase (the layer height in this case) implies that each layer has a close foundation and supporting surface to set the foundation for the next layer.
-
Incorporate a Chamfer Into Your Model
Integrating a chamfer into your 3D print model is a great technique to reduce overhangs and bridges in your 3D printing.
This method works well because including a chamfer into your model helps you reduce the actual angles of your printer model. It is a transitional edge between two parts of a print object.
In other words, instead of having a sharp 90° turn between corresponding sides of an object, you can introduce curvature to cut away at a right angle edge or corner for the creation of a symmetrical sloppy border.
-
Decrease Printing Speed
This tip on improving 3D print overhangs and bridges is somehow related to the cooling aspect and better layer adhesion. Reducing the printing speed implies that the extruded layers have more time to cool to form a great foundation.
A combination of decreased printing speed, better cooling, reduced layer height, and great part orientation can help you reduce the presence of overhangs in your 3D print speed significantly.
-
Moderate Your Printing Temperature
The ideal temperature for your 3D printing is the one that exudes well at the lowest possible temperature range. The last thing you want is to use a nozzle temperature that extends the appropriate printing temperatures you need unless you have other objectives.
This is because your filament will be hotter and more liquid than needed, which means that cooling will not be effective given the more melted filament. This will contribute to reduced overhangs and bridges.
-
Decrease Layer Width
This great tip to improve 3D print overheads and bridges works well because it reduces the weight of every extruded layer of print material. The decreased weight of your layer means that there will be less force or mass behind it hanging over inner layers.
Another outstanding advantage of reduced layer width is that you will have less material to cool down, which leads to faster cooling of the exuded material. However, a decrease in layer width might increase the overall printing time since you will be extruding less print material.
-
Splitting Your Model Into Multiple Parts
This method is more intrusive compared to the others but can work wonders with difficult prints. The idea here is to split your print models into smaller sections that decrease those 45°.
You can also use this trick when dealing with large projects and a small 3D printer that won’t fit the entire printing material. Some 3D prints are usually split into different parts to come up with one object.
-
Support Structures
Using supporting structures is one of the easiest ways to improve 3D print overhangs and bridges, given that it helps you create a supporting foundation instead of letting the overhang work the magic.
In most cases, it is hard to avoid support material completely despite your orientation, layer height, cooling level, etc. Some cases might also force you to take the initiative to add in the supportive structures through the slicer. There are some slicers in the market that allow you to customize your support material.
-
Tuning Up Your 3D Printer
The last thing you can do to improve 3D overhangs and bridges is simply tune up your 3D printer. Most of the time, you neglect your 3D printer over time and ignore the idea of regular maintenance for the best print quality.
3D printers are built to last for a long time without extensive care, but they consist of specific parts requiring extra care. These parts include; rollers, print nozzles, belts, and rods.
-
Alter the Orientation of Your 3D Print Model
Your print model’s orientation is another trick you can use to improve overhangs and bridges in 3D printing.
This means that you can rotate and adjust your 3D model to reduce the angles to print your model. You may not be able to reduce the angle below 45°, but you can get close to this angle.
What Is Bridging in 3D Printing?
Bridging in 3D printing is a displacement of material that links to two raised points horizontally. It implies that your 3D printer prints between two points without a connection to each other. Take, for example, two bridge pillars on which a bridge should be printed on.
A 3D printer usually prints the base layer and then builds the successive layers from this layer. On the contrary, there is no base layer between two points when bridging in 3D printing. Besides, 3D printing must be conducted in enough aeration to bridge the gap.
The most common problem with bridging in 3D printing is that the filament bridge sug because of gravity. Bridging is usually applied in the top layer of hollow 3D materials.
What is Overhang Angle? Which Angles Are Printable?
For you to create an overhang at any angle less than vertical, your 3D printer offsets every successive layer. The more the angle moves horizontally, or 90°, the more each upcoming layer is offset. For instance, with a 45° angle, the layer is offset by 50%.
Any angle exceeding the 45-degree mark is difficult to print. Angles beyond this point imply that every layer has less of the previous layer to adhere to. This causes printing poor quality objects with droopy filament strands. You should always try to avoid overhangs extending 45°.
Conclusion
As we all know, a 3D printer starts printing objects from the bottom up. Each layer of exuded materials is supported by the previous layer material or the print surface.
However, printing objects with more complex designs, bring about upper areas not supported by the underlying print material. These areas represent overhangs or bridges depending on the shape of the design of the spaces.

Recommended Reading
3D Printing vs Injection Molding
3D printing technologies use an additive manufacturing process. while injection molding involves adding molten material into a mold cavity. Let's dive into it!
Is It Legal to 3D Print Legos?
is it legal to 3D print legos? 3D printing lego is illegal. Nonetheless, there are some conditions. However, the interlocking toy bricks are not copyrighted...
Is 3D Printing Hard to Learn?
Is 3D printing hard to learn? It can be overwhelming to beginners because most printers are delicate and meticulous. First of all, you will have to invest time.