 by Mike Brooks |
Last Updated: February 3, 2022
by Mike Brooks |
Last Updated: February 3, 2022 Anyone who has ever printed a 3D object knows that there can be some nasty surprises waiting for you when it’s finished.
Warping, delamination, and other defects can ruin what would have been a beautiful print.
But did you know that annealing your prints can help avoid these problems and produce better prints?
Quick Navigation
- Annealing 3D Prints
- What Is Annealing in 3D Printing?
- Tips You Need to Know About Annealing Process in 3D Printing Process
- How Annealing PLA Works?
- Why Does PLA Need Annealing?
- How to Anneal PLA Prints
- Annealing PETG. Can PETG Be Annealed?
- How Much Will My PLA Shrink After Annealing?
- How Do I Clean My Prints After Annealing?
- Bottom Line
3D printing is a fantastic technology that has taken the world by storm. However, like any other technology, it has its quirks.
Annealing 3D Prints
One of the most common problems with 3D printing is that prints aren’t as strong as you’d want them to be. This is often due to applying insufficient heat to the print, which causes the plastic to cool down too quickly.
If you’re looking to improve your printed object, then you should anneal them! Annealing your 3D prints can be a great way to improve their quality and durability.
What Is Annealing in 3D Printing?
Annealing is a heat treatment process used to alter metals’ physical and mechanical properties at annealing temperatures. The purpose is to soften the metal, remove stresses, improve its ductility and toughness.
It is commonly used in the manufacturing of metals and alloys and the fabrication of metal parts. The process involves heating the metal to a specific temperature and then holding it at that temperature for a certain period.
The amount of time the metal is held at the annealing temperature will depend on the type of metal treated and its desired properties.
After the required time has elapsed, the metal is slowly cooled to room temperature.
Tips You Need to Know About Annealing Process in 3D Printing Process
Heat Deflection Temperature
Annealing is a process that should only be performed on metals capable of withstanding higher temperatures. The metal must be heated above the recrystallization temperature or heat deflection temperature but below the melting point.
Melting Temperature
Further, you must carefully control the annealing temperature and time to achieve the desired results. Cool the metal slowly to room or melting temperature after annealing. Again, you can perform it using either a gas or electric oven.
When doing it is a gas oven, you’ll apply the heat indirectly by heating the furnace walls at a suitable temperature. In contrast, you’ll heat the workplace directly when using an electric oven.
How Annealing PLA Works?
Annealing Polylactic acid works by heating the filament to a specific temperature and maintaining it at that temperature for a set period to break down crystalline structures within the material.
This is followed up by cooling under controlled conditions, typically in cool air or water, but sometimes with external fins or other equipment like heated print beds.
The process can be done multiple times and continually improves the material properties. PLA is an amorphous plastic, which means it does not have a regularly repeating pattern of atoms like you would find with metals or other crystalline materials.
It consists of irregular lumps called amorphous regions interspersed between other areas known as crystallites. When these long-chain molecules heat up, they become more mobile and can slide past each other a bit easier.
This reduces the material’s melting temperature, so it has an even lower viscosity when it is cooled back down.
Why Does PLA Need Annealing?
PLA is a thermoplastic that is made from cornstarch and sugar. It has a lower melting point than other thermoplastics, such as Acrylonitrile butadiene styrene (ABS) and Polyethylene terephthalate glycol (PETG). It can be melted quickly by the heat of an extruder nozzle.
The low melting point of PLA makes it susceptible to warping and shrinking when it is printed at high temperatures.
Annealing PLA removes the stresses caused by the 3D printing process at high temperatures and improves its ductility and toughness. This results in less likely annealed parts to warp or shrink and are more resistant to breakage.
PLA also needs annealing because PLA filament is made from biodegradable material. The annealing process gives extra strength and durability to the filament, making it more suitable for use in FDM printers.
How to Anneal PLA Prints
The annealing process can be performed using either a gas or electric oven. When annealing PLA filament, it is essential to use a temperature below the melting point of the filament.
The recommended temperature for annealing PLA filament is 175 degrees Celsius. The filament should be heated to this temperature and held for between 30 and 60 minutes. After the required time has elapsed, the filament should be slowly cooled to room temperature.
The metal must be heated above the recrystallization temperature but below the melting point.
The annealing temperature and time must be carefully controlled to achieve the desired results. The metal should be slowly cooled to room temperature after being annealed.
How Can You Anneal PLA Without Warping?
One of the main reasons people anneal PLA is to prevent warping, but how can you do this without an oven?
Although it’s not quite as effective as using a furnace, there are a few methods that can be used to heat your print enough to cause recrystallization.
- The first method is to place your print on top of an electric hotplate and set the temperature to around 100 degrees Celsius. Make sure the hotplate is level so that your print doesn’t warp while it’s being heated!
- The second method is to use a hairdryer. Point the airflow at the part for about 15-20 seconds, then turn off the dryer and allow the part to cool down slowly.
- The third method is to use a heat gun. The key with this method is to make sure the gun is held at a distance of about 15-20 cm from the print and that you move it back and forth slowly while heating. It’s important to note that none of these methods are as effective as using an oven, but they will help to minimize any warping that may occur.
Glass Transition Temperature. What Temperature Do You Anneal PLA?
The recommended temperature for annealing PLA filament is 175 degrees Celsius and takes utmost 60 minutes. You must, however, note that proper annealing time varies.
After the required time has elapsed, the filament should be slowly cooled to room temperature. Some materials can also be annealed at a 140 to 370 degrees Celsius glass transition temperature.
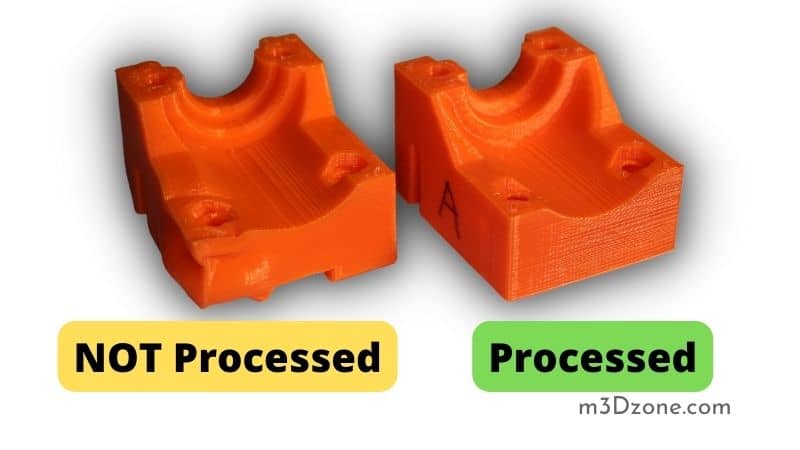
How Annealing Makes Your 3D Prints Better
The process results in more vital metal parts with a more even grain structure. When you anneal your PLA prints, they will be less likely to warp and change shape due to temperature changes over time.
It will make it easier for you to sand down your prints afterward (if you want) because their layers will line up neatly against each other.
Annealing ABS is especially advantageous when gluing ABS parts together rather than using the traditional solvent-aided bonding method.
Once your 3D print has been heat-treated, all of its surfaces and layers should have similar crystalline structures and therefore be more likely to bond better with adhesives or epoxies – especially if they come from the same spool!
Your print will most likely also be a bit shinier and colorful-looking after it’s been annealed since the annealing process tends to burn away any glossy PLA varnish that might have still been on your print.
3D prints treated with heat before being glued together don’t require as much clamping as unpainted ones because there’s a greater surface area for bond layers to touch.
In the case of metal parts, you won’t need as many bolts or rivets to hold them together either – under certain conditions at least! Annealing ABS filament makes it meltier during the extrusion process, which is good if you intend to print with ABS anyway.
It makes it easier for ABS filaments to bond with layers below them, reducing the chance of warping.
Annealing Transparent Materials
There are many different types of transparent materials, including annealed glass, fused silica, and sapphire. These materials have a high degree of optical homogeneity, which makes them incredibly well suited for applications such as fiber optics and lasers.
You must never forget to anneal transparent materials such as glasses at the glass transition temperature. Many other transparent materials exist but may not be as crystal clear as the three mentioned above.
For example, window glass is made from molten sand that has been cooled to form a solid with only microscopic surface irregularities on the order of 600 nanometers or less. In comparison, most sapphires have surface features several micrometers in size!
When annealing any material, the key is to raise it above its recrystallization temperature (T). It should be held at that temperature long enough for an adequate number of microcrystals to grow. A characteristic time-dependent growth curve.
As the number of nuclei increases exponentially, there comes the point where more energy is being put into growing crystals than new crystals are formed. This stage of growth is called static recrystallization because there is no net change in the size of the crystal.
At this point, the T becomes equal to the annealing temperature, which means that any further increase in temperature will result in no change to either crystal size or density!
Annealing transparent materials require heating them until they reach recrystallization temperatures, then quench, or cool rapidly.
The rate at which they have cooled dictates how quickly nucleation can occur and thus what shape the grown crystals will take. Slower cooling rates produce narrow grains, while faster cooling rates produce larger grains.
To achieve the best possible results, especially when annealing very pure materials like fused silica (silicon dioxide), controlling both T and cooling rate is essential.
The temperature must be maintained within 0.1 degree Celsius if annealing times are hours; however, for short annealing times (a few minutes), this tolerance can drop down to hundredths of a degree Celsius.
As for cooling rates, the difference between 50 millimeters per minute and 150 millimeters per minute can be profound. Less pure materials are usually more forgiving to imprecise T and cooling rate control.
You should note that transparent materials are susceptible to cracking during annealing. Even attempts to avoid introducing any stress on the material by controlled cooling in water baths can be risky!
Annealing transparent materials is a tricky business requiring temperature uniformity, temperature accuracy, and a crystal growth rate that can be precisely tuned.
Annealing PETG. Can PETG Be Annealed?
One of the most frequently asked questions about annealing is whether or not PETG can be annealed. The answer to this question is a little bit complicated. PETG has a much lower recrystallization temperature than PLA and ABS, so it is challenging to anneal successfully.
However, if you can raise the temperature above the recrystallization temperature and hold it there long enough, PETG will anneal just like any other material. The main challenge is achieving the required temperatures without damaging the object you are printing.
Since PETG has a lower recrystallization temperature than PLA or ABS, it is more susceptible to damage if the temperature is too high. This means that the annealing temperature must be lower and the time at temperature needs to be longer to achieve successful results.
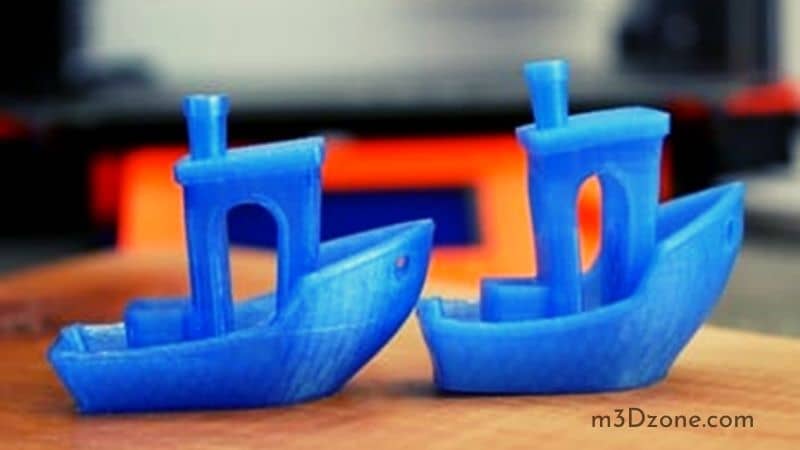
How Much Will My PLA Shrink After Annealing?
Your PLA will shrink a lot. It’s not uncommon for it to shrink up to 10% in all dimensions! You should think twice about printing parts with very thin walls or overhangs, especially if they’re long and unsupported because your part will warp and change shape noticeably from being annealed.
This includes overhanging chamfers on the side of your print. If you want the edges to line up nicely with each other after annealing them, make sure their bottom layer doesn’t have any sharp corners or cuts around it since those can get stressed easily by heat treatment too.
Remember, annealing improves your 3D objects by making them stronger.
On average, your ABS prints might shrink about 2-3% in all dimensions before they start warping significantly from being annealed. Your part’s shape might change a bit, too, especially if you have very thin walls or overhangs.
If the walls are too thin to remain straight without bowing out toward the inside of your print after being annealed, they’ll most likely break off when you try removing it from your build plate.
How Do I Clean My Prints After Annealing?
Abrasives or solvents will remove cold-bed ooze so the part can be glued in place. However, it would help if you were careful not to move around too much while sanding/scraping your print because that could cause it to warp or crack.
If there are any especially thin pieces on your model – like threads or tiny whiskers of plastic – then they might become even lighter after treatment and may break off entirely afterward. Clean up all loose ends by scraping them with a razor blade or file!
Bottom Line
Annealing is the best way to make PLA and PBS prints warp less when handled because it straightens out the internal layers of the filament while allowing the exterior to remain unchanged.
Make your 3D print look cleaner and shinier by annealing it before you use it for anything! It is the best treatment you can give your ABS prints since it straightens out the internal layer, so they don’t warp when you handle them!

Recommended Reading
Is It Legal to 3D Print Legos?
is it legal to 3D print legos? 3D printing lego is illegal. Nonetheless, there are some conditions. However, the interlocking toy bricks are not copyrighted...
PLA vs. PETG. What Is the Best One?
PLA vs. PETG: PETG is generally stronger than PLA in regards to tensile strength. It's also more durable and is more flexible than PLA filament.
What Is SLS 3D Printing? Selective Laser Sintering Guide.
What is SLS 3D printing? SLS technology uses a high-power laser to sinter small polymer powder particles into a solid structure 3D model. Let's dive into it!