 by Mike Brooks |
Last Updated: May 5, 2022
by Mike Brooks |
Last Updated: May 5, 2022 As a 3D printing professional or enthusiast, you may be seeking to expand your 3D printing capacity. As such, there is no better way of achieving the same than to learn how to 3D print molds.
As an Amazon Associate, I earn from qualifying purchases. If you make a purchase after clicking on a link I may earn a small commission at no extra cost to you.
3D printed mold for pattern casting (3D printing molds for casting) is rising in popularity in the 3D printing industry.
Quick Navigation
- 3D Printing Molds for Casting
- How to Make a Mold With 3D Printer?
- Process of Creating Silicone Molds Out of 3D Printed Parts (14 Easy Steps)
- Step 1: Choose a File to Cast the Mold Around
- Step 2: Create a Mold Box
- Step 3: Prepare the Print
- Step 4: Suspend Master in Mold Box
- Step 5: Open the Bottle of Silicone and Stir Properly
- Step 6: Measure
- Step 7: Mix the Silicone
- Step 8: Pour Silicone Into the First Part of the Mold Box
- Step 9: Let It Cure
- Step 10: Attach the Second Part of the Mold and Pour Silicone Into It
- Step 11: Breakdown Mold and Remove
- Step 12: Re-assemble and Prepare Molds
- Step 13: Measure Resin and Add Dye
- Step 14: Let It Cure
- How to 3D Print a Mold?
- Can You Make Molds With a 3D Printer?
- Can You 3D Print Ceramic Molds?
- Can You Make Resin Molds With a 3D Printer?
- Can You 3D Print a Cast?
- Investment Casting
- Conclusion
It shapes the way forward through the mold boxes that help you to acquire various 3D printed products. Significantly, you can use the products in foundries or in-house.
3D Printing Molds for Casting
So, what is the difference between printing the 3D mold box and the standard 3D printing of projects?
The main difference lies in how you arrive at your final 3D print object. Standard 3D printing remains a means to an end. Meaning, that once your printer stops and your molten metal or plastic material cools, you get your end product.
Also, standard 3D printing is an additive manufacturing process. Meaning you build your shape as you print. Equally, your design falls into place as the material extrusion from the print nozzle continues.
Contrastingly, 3D printing molds introduces an unusual extra step in the 3D printing process.
First, you need to print a container or a mold box that serves as an inversion of your final design. Then, fill your mold box with the final manufacturing material, let it dry then open the mold box to reveal your final product.
This article walks you through 3D printing molds for the cast, mold types, and how you can print molds.
How to Make a Mold With 3D Printer?
To create a mold or a cast, you need to master the art of precision. When manufacturing printed mold, mistakes remain costly. Thus, every feature, detail, and customization comes at a price, whether it is a one-off piece or meant for mass production.
As such, 3D printing eliminates costly mistakes in molding complex shapes. It achieves the same by providing precision in molded parts.
Also, 3D printing professionals enjoy the advantages of the technology’s abilities to customize molds for prototypes, metal parts, jewelry, and cast complex geometries.
Process of Creating Silicone Molds Out of 3D Printed Parts (14 Easy Steps)
Step 1: Choose a File to Cast the Mold Around
Pick a file you would like to make or create material not supported by your printer.
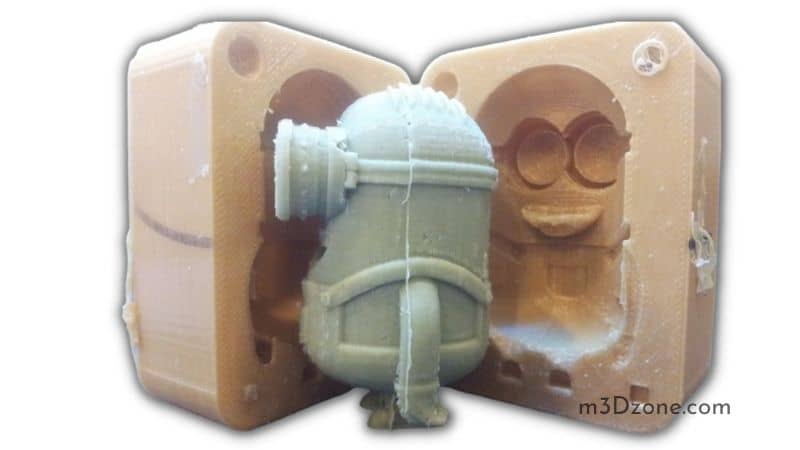
Step 2: Create a Mold Box
Create the structure that will hold the silicone in place when pouring around your part. Also, create a mold box that perfectly fits the part you intend to make.
Step 3: Prepare the Print
The silicone molding process is not demanding on a 3D-printed mold box. It offers you the opportunity to select standard settings for the procedure.
Step 4: Suspend Master in Mold Box
You may suspend your master using popsicle sticks, skewers, or 3D-printed rods glued to the surface of the master. Additionally, the holes left in place after your mold cures will quicken resin flow through your mold.
Step 5: Open the Bottle of Silicone and Stir Properly
As silicone comes in two parts, you need to mix both individually, and once combined with its hardener, mix slowly using separate mixing sticks.

Step 6: Measure
Get the right volume of silicone required to fill in your mold. Furthermore, get a measure of the desired amount of silicone and separately measure it in two different measuring cups.
Step 7: Mix the Silicone
Once you have measured each part, you need to combine the two elements into one mixing cup and stir slowly with a mixing tool.
Additionally, you need to avoid stirring air bubbles in the process. Scrape the thin walls and all the sides of the cup to mix all the material.
Remember, the curing process only begins once you thoroughly mix up your material.
Step 8: Pour Silicone Into the First Part of the Mold Box
Pour silicone into the first of the mold halves. Do it slowly in one corner of the mold box and allow the silicone to move to the other parts until it fills it up.
Once you have poured silicone, place minor keys into the silicone. It will create mold halves that will fit together once you pour silicone. Also, you will have to remove these keys before showering them into the second half of your mold.
Step 9: Let It Cure
Depending on silicone type, the curing process may take between 75 minutes to an overnight stay to complete. Notably, temperature and humidity determine curing times. So, do cure in a room temperature environment.
Step 10: Attach the Second Part of the Mold and Pour Silicone Into It
Once you set the mold, start preparing the second part. Also, this is the time to remove the keys you had earlier inserted.
Next, attach and secure the second half of the mold box. Finally, pour silicone into the second part of your mold.
After pouring the silicone into the second half of your mold, let it cool.
Step 11: Breakdown Mold and Remove
The moment both halves of your mold have cured, you will know you are ready to remove them from the mold box and start using them to recreate parts.
Step 12: Re-assemble and Prepare Molds
Correctly align all parts of your mold and plug in any holes created by the vent. Additionally, you may need to secure mold pieces using rubber bands, straps, or tapes.
Step 13: Measure Resin and Add Dye
You can mix a more significant resin and pour several molds at once if you have made a number of them. Equally, add dye to the parts of the resin mixture as provided in the instructions.
Then, mix and pour the resin into your mold.
Step 14: Let It Cure
Like in the other curing processes, let your material stand for a required period depending on the type of resin.
Finally, open the mold and remove the cooled material.
How to 3D Print a Mold?
3D printing a mold is not a complicated process as it does not require a lot of specialized equipment.
To successfully 3D print a mold, you will need the following equipment and material that should be readily available to any 3D printing hobbyist or professional:
A 3D Printer
There are numerous 3D printers available in the market. Therefore, depending on your budget, the type of project, and workspace availability, you should get one that suits your specific needs.

A 3D printer remains essential for a printed mold as it ensures mold quality through the precision and accuracy that 3D printing brings on board.
Drafting Software
Drafting software remains a vital aspect of printing a 3D mold. Similar to choosing a 3D printer, you can go as big or as small as you prefer when seeking to get the perfect design tool that will help you bring to life your desired printed mold.
You have options to pick from as there are a lot of free AutoCAD equivalents available on the internet. Besides, you can find a vast range of programs that you can pay for or subscribe to use.
The software will help you design molds to your required specification giving you the options you need. Furthermore, it helps stretch your imagination to create a mold of any shape.
3D Printing Filaments with High Heat Resistance and Stiffness
Your 3D printed mold will be subjected to many temperature changes and manipulation before you get your final print. Therefore, you need to print the mold from material that can handle heat deflection temperature regularly.
On this front, you may use the digital ABS instead of the standard ABS (check at Amazon). It enjoys a higher temperature rating for parts expected to handle more temperature changes during the molding process.
Material for Filling in Your Molds
Notably, use any printing material that will meltdown and later harden into a solid model in your mold shape. These materials range from sand, metal, or any other thermoplastic material.
If you are new to injection molding, 3D printing experts and hobbyists recommend using silicone material for filling in your molds.
Besides, it is easy to work with silicone as it mixes flexibility and firmness qualities for superior printed molds.
Mold Release
Always use a spray to coat your mold before your pour material such as silicone in it. Spraying this coat into your mold makes the print easy to remove when it dries up.
Additionally, when you equate your mold release to a cooking spray (check at Amazon) for your 3D printed molds, you find that it is cheap and easier than using wax patterns or hoping it does not break when taken out.
Can You Make Molds With a 3D Printer?
Yes. Silicone molding is a production method that you can combine with 3D printing to make several copies of the same products.
Furthermore, it allows you to manufacture a material or filament that your 3D printer may not support.
Can You 3D Print Ceramic Molds?
Ceramics enjoy various excellent properties that make them favorites for use in a wide range of applications. You can apply ceramics in the chemical industry, machinery, electronics, aerospace, and biomedical engineering.
Notably, the qualities that make them versatile materials include high mechanical strength, hardness, and good thermal and chemical stability.
Thus, you can 3D print ceramic molds. Ceramic components are formed into desired shapes using conventional technologies, including injection molding, die pressing, tape casting, and gel casting.
The latest advancement in material science and computer science offers a great variety of 3D printing technologies. You will find that a combination of 3D print technologies specializes in ceramic manufacturing.
Can You Make Resin Molds With a 3D Printer?
Using a resin 3D printer with high-temperature resistance, stiffness, and resolution offers you detail and durability to make molds from the small injection mold.
Also, if you intend to inject liquid plastic into a 3D-printed mold, it should not melt the mold. Always use resin with high-heat deflection temperature whenever 3D printing molds.
Furthermore, using resin whenever removing a cast from a 3D printed mold helps avoid wear and tear associated with this process.
Can You 3D Print a Cast?
Yes, you can 3D print a cast.
A 3D printed cast or orthopedic cast is a shell formed from a plastic that medics use to encase a limp or portion of a body to keep it structurally stable to allow it to heal.
Investment Casting
Investment casting produces precise components and minimizes material wastage at the same time. More importantly, it helps create very intricate parts; design engineers find investment casting very useful.
It uses a shell made of ceramic, plaster, or plastic formed around a wax pattern.
Then, you can melt the wax using a furnace, and molten metal is poured into the shell creating the casting.
Related: Brief Update on 3D Houses
Conclusion
3D printing hobbyists and professionals agree that 3D printing of molds for the cast is another exciting addition to the growing applications of 3D printing technology.
More significantly, 3D printing molds offer advantages that include low-cost manufacturing, complicated design possibilities, less material wastage where CNC machining involves milling or sand requirements, and the ability to recycle waste material.

Recommended Reading
3D Printer Bed Adhesion. Tips to Improve Glass Bed Adhesion!
Having 3D printer bed adhesion problems? You can classify bed adhesion into two types: bad and good adhesion. Let's see how to get always the good one!
What Is 3D Printing Used For?
So what is 3D printing used for? It can be used to create parts of a car, smartphone cases, fashion accessories, organs, and many more. The choices are endless!
How to Prevent & Fix 3D Filament Sticking to Nozzle
How to prevent your 3D filament sticking to nozzle? Your nozzle may be clogged in some cases; clear it as best you can. Increase the warmth of your bed...