 by Mike Brooks |
Last Updated: June 23, 2022
by Mike Brooks |
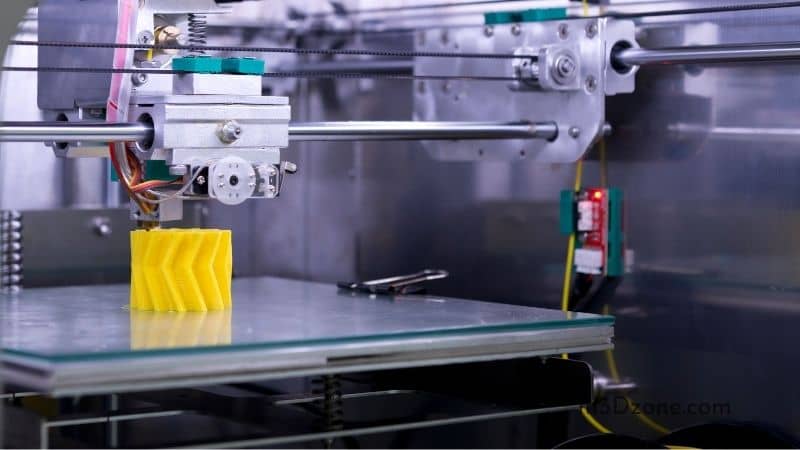
Last Updated: June 23, 2022 Yes! You can comfortably 3D print objects on glass. Also, it remains one of the most widely used 3D printer beds among professionals.
As an Amazon Associate, I earn from qualifying purchases. If you make a purchase after clicking on a link I may earn a small commission at no extra cost to you.
Many 3D printers don’t come with a glass bed. Interestingly, 3D printing professionals and hobbyists aim to upgrade the bed surfaces to glass print beds.
Quick Navigation
- So, Can You 3D Print on Glass?
- How to Make 3D Objects to Stick on Glass Beds
- What Types of Glass Is Used for 3D Printing?
- What Is the Best Glass Surface for a 3D Printer?
- Important Things to Take Into Account When Using a Glass Print Bed
- What Steps Do You Need to Follow for Best Results When Printing on Glass?
- Is Printing on a Glass Bed Expensive?
- Conclusion
Upgrading the print bed surface to a glass heated bed is occasioned by the benefits of the glass print beds. Glass material gives the printer beds unique characteristics that make it ideal for 3D Printing.
A 3D printer glass bed remains one of the best options for producing 3D prints with a flawless bottom because it is flat and smooth, removing prints from the glass bed is quite enjoyable as it is easy, and you need to give the printed object a simple knock.
The article serves to provide you with a comprehensive guide on all you may need to know about the 3D printer glass bed and its benefits.
So, Can You 3D Print on Glass?
Let’s find out what things you need to take into consideration to make your 3D prints stick on the glass bed.
What Is Heated Bed Adhesion?
Bed adhesion stands for the ability of 3D printed plastic to stick to the build plate while printing. If the prints or objects fail to stick to the build plate or bed surface, it produces poor results.
The prints will be curled and shifted. Also, in severe cases, the prints may be warped and damaged.
What Are the Factors Affecting Heated Bed Adhesion?
-
Wetting the Build Plate
It refers to the ability of a liquid to conform and stick to a solid surface or the bed surface in 3D printing circles.
3D printers work by extruding the first layer of the plastic filaments through the nozzle to the heated build plate. Build plate adhesion is improved by wetting the bed surface with adhesion assistants.
Brims are a perfect example of the adhesions added to the base of prints to increase the contact surface area, making for excellent bed adhesion.
-
Thermal Expansion
It refers to the change in object dimensions when subjected to different levels of temperature. Notably, temperature differences between the object’s print head and bottom parts can cause edges to peel off during printing.
It is a pronounced challenge in plastic filaments such as ABS that requires a heated build plate for 3D Printing. Therefore, better thermal stability is crucial to avoid warping during 3D printing.
A standard and uniform 3D printer bed temperature ensure thermal shock resistance, leading to better print quality.
-
Level Printing Glass Beds
It is vital to ensure a level printing plate to allow the molten filament from the 3D printer nozzle to settle consistently during 3D Printing.
Controlling the nozzle to remain at a consistent and reasonable distance from the build plate is significant to print quality.
It would help to place the printer nozzle close to the build plate to ensure the molten plastic filaments stick to the bed surface. Thus, maintaining the same distance for the nozzle is vital.
How to Make 3D Objects to Stick on Glass Beds
-
Glass Bed Flatness
You need to check and confirm that your glass surface is flat and completely even.
Having an even glass bed surface causes sections of your first layer not to stick to the glass bed surface. The failure of the layer to stick to the glass bed causes a failed print.
-
Adjust Your Glass Bed to Be Level
Constantly adjust your glass bed to ensure the optimal distance between the 3D printer nozzle and the build plate.
Otherwise, if there is no proper bed leveling and some sides are too close to the build-up plate, it causes the 3D printer to print damage or total print failure due to warping.
-
Cleaning of the Glass Bed
A clean glass bed is essential in the manufacturing of quality 3D prints.
Therefore, regularly cleaning the 3D printer glass bed helps ensure 3D Printing on glass works due to the subsequent good bed adhesion.
Regular glass bed cleaning guarantees a clean build surface that helps in the production of clean and quality 3D prints.
You can use a glass cleaner; alternatively, you may choose to use a clean piece of cloth and isopropyl alcohol to clean your 3D printer glass bed.
-
Use of Adhesives
The use of adhesives makes glass beds more effective in the 3D printing process. We have different types of bonds with glue sticks (check at Amazon) and hair spray which are commonly used.
Often, a heated glass platform does well to ensure extruded plastic filaments stick on the build plate.
However, delicate features and sharp object corners are prone to falling off and getting damaged.
-
Adjusting Glass Bed Temperatures
In 3D printing, the first layer of plastic filament extruded from the 3D printer nozzle may cool too fast. If this happens, the 3D print contracts and never sticks to the glass bed heated build platform.
Therefore, in case you are experiencing glass bed adhesion issues, you will need to increase your glass bed temperatures to higher temperatures.
A 5-degree incremental temperature adjustment will ensure you eventually get to optimal glass bed temperatures for quality prints.
-
Turning Off the Print Fan
Even with other bed surfaces, you may avoid using adhesives such as the glue stick and hair spray by making good use of the 3D printer fan (check at Amazon).
You can achieve it by switching off your 3D printer fan the moment you start printing your first layer on the flat surface of your 3D printer glass bed.
Consequently, switching off your printer fan ensures the first layer does not cool too quickly, as this damages the prints.
When you are through printing your first layer, you can now switch back your 3D printer fans for the subsequent layers.
-
Sand Your Glass Bed Surface
Roughing up your glass bed surface through sanding it up helps create a texture that readily helps the print stick to the glass bed.
You may apply sandpaper (check at Amazon) for this purpose, all you need is to rub it lightly on the glass bed to ensure you achieve the required results.
You may use Sandpaper to clean the glass bed whenever the particles of the prints stick tightly on the glass bed. Also, that may not be easily removed by other cleaning methods
-
Maintaining a Proper Distance Between Nozzle and the Print Bed
Regulating and adjusting your Z-Offset ensures a proper distance between the nozzle and the print bed.
Adjusting your Z-Offset ensures the filament doesn’t stick to the glass bed when the nozzle is far.
Placing the nozzle too close to the print glass bed may affect the quality of the glass bed adhesion causing poor prints.
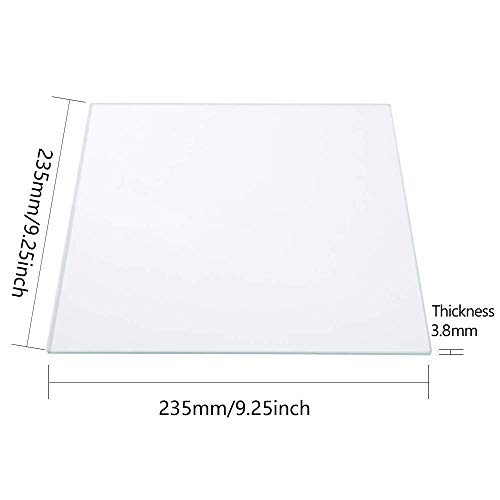
What Types of Glass Is Used for 3D Printing?
3D Printing on glass beds provides numerous advantages over other bed surfaces. Here are the types of glasses used in 3D PrintingPrinting,
a) The Borosilicate Glass
Borosilicate glass can be manufactured by mixing boron trioxide and Silica. Therefore, this blend produces Borosilicate glass with characteristics that 3D printing hobbyists and professionals seek for their 3D printer glass beds.
Notably, borosilicate glass is highly durable and enjoys a low propensity to thermal expansion. Also, it remains highly resistant to thermal shocks.
Borosilicate glass doesn’t crack under extreme and sudden temperature changes, as is familiar with other build plate materials.
Borosilicate glass also ensures minimal or no physical changes taking place over the printing course.
b) Tempered Glass
Tempered glass refers to a glass treated to offer high thermal stability.
Therefore, one of the standout characteristics of tempered glass is that it can withstand higher temperatures with no adverse effect.
You can heat-tempered glass to temperatures as high as 240 degrees centigrade.
Likewise, tempered glass serves as the best option for professionals and 3D printing hobbyists who may want to print with high-temperature filaments like ULTEM (check at Amazon) and PEEK.
These two filaments are extremely high-temperature, and tempered glass is the best material for the glass bed platform that can accommodate their Printing.
c) Regular or Normal Glass
Many 3D printer users use regular glass, mirrors, and glass used in photo frames with notable success. Although it can’t withstand high temperatures, it breaks because it is not treated like the borosilicate glass. It remains popular because it’s cost-effective.
A notable disadvantage of the regular glass is that it sticks on the build plate platform. Consequently, it may force users to put it in a fridge to cool before print removal.
What Is the Best Glass Surface for a 3D Printer?
Having looked at the three different glass types used in making 3D printer beds, it seems evident that the Borosilicate glass stands out as the best and the ideal glass for use in 3D printer bed usage.
It boasts the best glass surface, low thermal expansion, and high heat and temperature shock resistance.
It retains a smooth, firm, flat surface that offers excellent print results with exceptional bed adhesion free from warping challenges.
Important Things to Take Into Account When Using a Glass Print Bed
A 3D printer bed is an essential component of the 3D printer. Also, it provides the surface upon which to print the 3D object.
Therefore, the type of material used for the bed is vital as it determines the print quality.
The glass beds stand out as one of the best in the 3D printing industry because of the following reasons;
1. Even-heat Distribution
3D printers heat plastic filaments before depositing the hot molten on the 3D printer bed build platform. Primarily, in other print bed types made from different materials, heat typically builds up in areas where you deposit the hot filament.
This heat from the deposited filaments tends to cause warping of the print beds, causing failed prints. However, the 3D printer glass bed allows even heat distribution around the printer bed and its surroundings.
Thus, the cooling cycles are even and consistent, eliminating the risk of print damage due to warping.
2. Glass Surface Is Smooth
Glass material offers the best option for the smoothest 3D printer beds. A rough printer bed surface produces prints of poor quality as the surface is not even, affecting the final print dimensions negatively.
The surface of the printed objects will be as rough as the printer bed on which they were published.
Thus, a glass bed, being smooth, offers prints with equally fine features and dimensions.
3. The Glass Surface Last Long
Glass beds last longer, saving users the extra cost of frequently changing printer beds. Moreso treated glass made of silica material is very durable. The Silica is heated, melts, and then fuses to form a powerful bond.
Also, it is essential to note that glass doesn’t degrade since it is familiar with other printer bed materials. Equally, glass beds don’t suffer from unexpected failures.
4. Prints Don’t Stick on Glass Surface
Many 3D printer beds are prone to having prints stick on their surface, posing a challenge to object removal and bed surface cleaning.
However, the glass printer bed surfaces are an exception. It is because the glass beds offer a nonstick surface.
5. Glass Beds Saves on Preparation Time
Cleaning a proper glass bed takes little time. Sometimes as little as thirty seconds. Also, applying a new layer of adhesion takes seconds.
Thus, preparing for the next print operation takes minimal time as there is no need for replacing things or running out of materials between prints.
You save valuable time that counts in the overall planning of your 3D printing process.
6. Inexpensive Upgrade
Users get a lot from glass beds when it comes to non-printable upgrades. Notably, at between $12-30, glass beds prove an economical and impactful option.
Also, it saves the user time and significantly improves print quality.
7. Easy Print Removal
When the printing process is complete, let the glass bed cool down first. Afterward, you may be surprised at how easy it is to remove the object from the glass bed surface.
Sometimes, the object pops out on itself, or you may only need to give it a gentle knock to remove it.
Thus, you won’t need to get your scraping tools, as may be the case with printer beds made of other materials.
Ease of object removal saves the user’s time, and effort. Also, it eliminates object damage risks.
What Steps Do You Need to Follow for Best Results When Printing on Glass?
For best results, while printing on a 3D printer glass bed, you need to follow these simple tips;
1. Glass Bed Installation
Glass beds are easy to install compared to other printer beds made from different materials. The first step is picking your preferred glass bed, and it should be followed by deciding on the types of adhesives you intend to use.
You will need to cover the glass bed with standard adhesives such as the PEI sheets (check at Amazon) or the glue sticks after installation.
Installation remains simple as you need to secure the glass bed by cutting square thermal adhesive pads (check at Amazon) and attaching them to the printer’s base; connecting these pads to the printer provides stability to the glass bed.
2. Cleaning the Glass Bed
Glass beds are used with other adhesives and lubricants to ensure the print sticks on the glass bed for great prints.
Therefore, frequent glass bed cleaning remains necessary to ensure the glass surface is clean for superior prints. So, cleaning adhesives and other lubricants from the glass bed to ensure they don’t pile up to create dirt.
3. Object Removal
Removing printed objects from the glass bed after the printing process is complete and cooling off the glass bed is the easiest part of the 3d printing process.
You may gently knock off the print from the glass bed if it hasn’t popped off by itself.
Is Printing on a Glass Bed Expensive?
3D printing glass beds are not expensive. More importantly, if you consider the benefits and overall impact they bring to the process.
An average of between $ 12-30 may be considered economical and cost-saving prices considering that the glass beds are the best the 3D industry can offer at present.
Conclusion
The advent of 3D printing glass beds revolutionized the 3D printing process coming with a lot of benefits.
Among the benefits are the even heat distribution, smooth, long-lasting glass surface, prints not sticking on the glass surface, ease of object removal, and the fact that glass beds are an inexpensive upgrade to beds made of other materials.
This article provides in-depth information on 3D printer glass beds, so you now know better. Upgrade to glass beds to enjoy the benefits that it offers.

Recommended Reading
Gaps in 3D Print. Easy Guide to Fix Them!
What are gaps in 3D print? Gaps are defects found on the sides and surface of 3D printed models. These are tiny holes and failed print spots that cause...
How Fast Is a 3D Printer?
How fast you can 3D print depends on multiple factors including your printer, filament used, the resolution required, size of the parts, nozzle-size, etc.
What Is TPU Filament? The Basics & Useful Guide.
What is TPU filament? It originates from a class of polyurethane plastics with important features such as high elasticity, transparency, and resistance to...