 by Mike Brooks |
Last Updated: April 28, 2022
by Mike Brooks |
Last Updated: April 28, 2022 Every 3D printing professional or enthusiast enjoys getting the best result in each printing experience.
As an Amazon Associate, I earn from qualifying purchases. If you make a purchase after clicking on a link I may earn a small commission at no extra cost to you.
Hobbyists don’t always get high-quality prints with every print experience. Sometimes, you may check your final 3D print after completing the printing process only to find an object with gaps.
Quick Navigation
Gaps in 3D Print. Why Do They Occur?
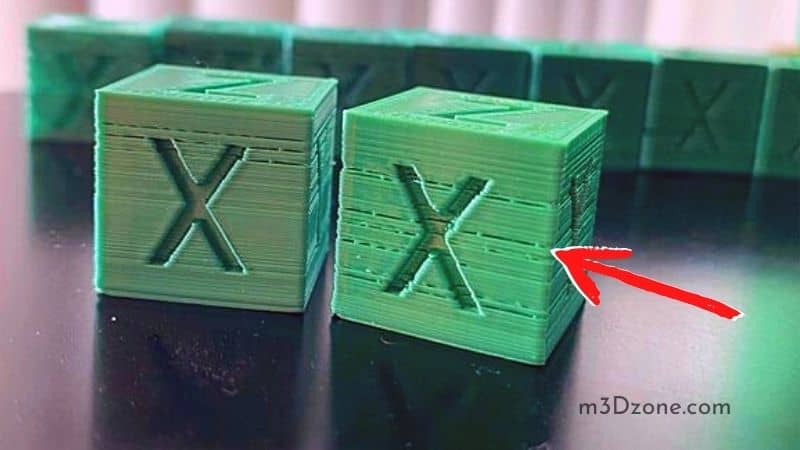
In 3D printing, gaps are defects found on the sides and surface of 3D printed models. These gaps are tiny holes and failed print spots that cause poor surface finish.
Additionally, gaps in 3D prints result from:
- Under extrusion
- Low printing temperature
- A high printing speed
As such, if gaps appear in your 3D models, it will be helpful if you work on the following:
- Bed re-leveling
- Increase printer temperature
- Decrease printing speed
This article is a comprehensive guide on 3D printing model gaps and how to fix them. Read on!
Why Are There Gaps in 3D Print?
Holes & Layers Gaps in 3D Prints
3D printing hobbyists need to be extra vigilant when printing the first layer. Most 3D print gaps occur in this stage.
The nozzle extrudes molten filament on the printer build surface to lay the first layer in additive manufacturing. It is followed by subsequent layers, laid upon layers until the 3D printed object is complete.
3D print layers gaps abound in different forms and have other causes.
Too Large Z-Offset
Gaps between the lines occur due to the significant physical distance between the printer nozzle and the build platform. A large Z-Offset means the nozzle operates far from the print bed. It has the effect of preventing the layer lines from squishing during extrusion.
So, adjusting the Z offset ensures that you maintain an adequate distance between the nozzle and the print bed, thus eliminating 3D print gaps.
Under Extrusion
Filament under extrusion is another cause of 3D gaps as top layers won’t provide the solid foundation needed to hold subsequent layers. Also, under- extrusion is why each line won’t come out as expected.
Gap Between Nozzle and Build Plate Is Too Narrow
Sometimes, 3D prints come out with areas missing material. When the gap between the printer nozzle and the bed is extremely narrow, the nozzle can scrape the build surface if too close to the build platform.
Additionally, it prevents material extrusion and, in severe cases, causes nozzle clogging and hardware damage.
To offset the challenge, you’ll need an adequate Z offset calibration.
Leftovers, Bumps, and Warps in Build Platform
3D printing takes place on the printer build plate or surface. You need to ensure your build surface is clean before you embark on a new printing session.
Otherwise, the small bumps, warps, and leftovers may create challenges leading to 3D print gaps.
Poor Bed Adhesion Issues
Inadequate print bed adhesion makes it difficult for extrusion lines to attach to the build surface. The first layer will struggle to stick to the printer bed surface, and the top layers will warp for lack of a solid foundation to rest.
Over Extrusion
Nozzle over extrusion causes severe 3D print gapping challenges. A gap will form if the nozzle extrudes the top layer upon the first layer. Therefore, it would be helpful to get your extrusion multiplier settings correctly.
High Print Speed
If you 3D print an object using an extremely high print speed, the chances are that you’ll end up with 3D prints that have gaps. The gaps will form because you won’t have solid layers to lay the subsequent layers.
Misconfigured Retraction Settings
Retraction settings in 3D printing optimize the amount of filament the nozzle can extrude. At the same time, it controls the speed at which the nozzle recoils, retracting unwanted filament.
Therefore, if your retraction settings are wrong, you’re bound to face 3D print gapping issues because the nozzle will extrude unwanted filaments on the build platform.
Poor Filament Quality
Using filament of poor quality causes nozzle clogging leading to poor extrusion—a sure way to 3D gapping challenges.
Blocked Printer Nozzles
Blocked printer nozzles cis caused by poor retraction setting and use of low-quality plastic filaments. It can easily lead to under extrusion, causing 3D print gaps.
How Do You Fill Gaps in 3D Printed Parts?
How to Eliminate Gaps Between Layers
To eliminate gaps between layers that look like holes and pockmarks, you must appropriately set your printer extrusion calibrations and retraction settings.
Also, you need to keep filaments dry and store them appropriately to stop them from absorbing moisture and deteriorating.
Layer Separation
More importantly, you eliminate layer separation by:
- Adjust the nozzle temperature to optimal values
- Reduce print speed to support two or more layers to bond
- Use printer enclosure for ABS and Nylon filaments to stop warping
How to Eliminate Top Layer Gaps (Partially Hollow Interior)
Top layer gaps refer to the layers you print last. Essentially, top layers close up the model and its partially hollow interior; as such, their printing must be excellent.
To eliminate top layer gaps in a 3D print model;
- Optimize your extrusion calibration
- Increasing the infill percentage eliminates gaps between lines
How to Eliminate Wall Gaps
The partially hollow interior consists of thin walls that can inhabit gaps. To work on these gaps, you can use an infill overlap using a Cura 3D slicer and an outline overlap if you’re using a Simplified 3D slicer.
Importantly, they control the amount of infill overlap with the outline perimeter.
You can successfully eliminate wall gaps by reducing the print speed and increasing the partially hollow infill percentage.
You may want to fill in gaps in the post-processing stage of your 3D printing. The 3D industry has several products that will help you in this endeavor;
How Do You Fill Gaps in PLA Prints?
5 Top Fillers for Your PLA 3D Prints
1. Apoxie Sculpt
It remains a popular product for filling gaps out of your 3D print. It is smooth and easy to mix. You don’t need any unique tool or technique to mix it.
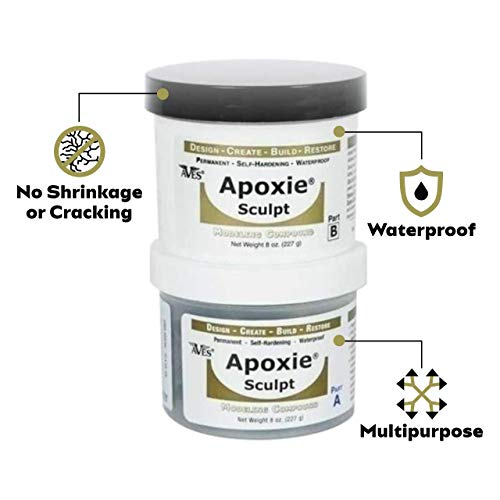
Importantly, it combines the sculpting clay benefits and the strength and adhesive properties of the Epoxy.
It provides a permanent, self-hardening, and waterproof solution you need for your 3D print gaps.
2. Bondo Glazing
This 3D print gap filler is durable and easy to use, making it one of the most popular in the market. Additionally, it works fast and rarely shows any shrinkage signs during use.
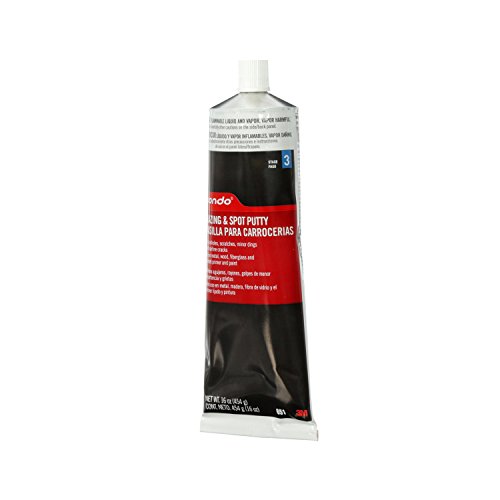
It provides a smooth finish making it ideal for filling 3D print holes and seams. Furthermore, it comes ready for use from the tube; you don’t need to do any extra work like mixing.
It produces no stain, takes only three minutes to work, and you can sand it thirty minutes after filling.
3. Bondo Body Filler
The Bondo Body Filler helps in bonding purposes. It cures fast and provides your 3D print with everlasting durability.

Also, the filler helps prevent shrinkages and forms shapes within minutes of application.
It enjoys high strength and ease of usage, making it a favorite of the motor vehicle industry.
4. Elmer’s ProBond Filler
It is one of the most effortless fillers to use in the market.

It dries up fast, within 15-30 minutes of application. Other benefits include:
- Easy to clean
- Odorless
- Strong adhesion
5. Rust-Oleum Automotive 2-in-1 Filler and Sandable Primer
It is widely used in industries involving DIY, especially the 3D printing industry. It has a 2-in-1 formula that allows for durable and long-lasting outcomes.

Its primary benefits include:
- Durability
- Easy usage
- Easy sanding
- Excellent finishes
How Do We Fix a Gap in the First Layer?
Fixing gaps in your 3D print first layer calls for reversing the primary causes of the first layer gaps:
Check and Confirm Your Build Plate Is Level
Always check to ensure that your printer bed is flat and level. Plastic filaments will not attach to a warped printer bed, causing first layer gaps. Adjust your bed compression springs or replace them with tougher ones.
You can acquire silicone leveling columns to stabilize the position of your build plate.
Increase Printing Temperature
Low nozzle temperature can cause a poor filament flow to the print bed through the nozzle. As such, it would be helpful if you increased your printing temperature. It ensures the proper flow of filament.
If you’re still having gapping issues, check whether your filament diameter conforms with the printer’s specifications.
Adjust Line Width Settings
You can quickly eliminate 3D print gaps by using appropriate Line Width Settings. For example, the default slicer settings for the first layer line width are 100% if you’re using a Cura slicer. However, some users allude to setting it at 120% and getting better results.
Check Flow Extrusion Rate
You need to set your printer extrusion settings to ensure it conforms to the manufacturer’s recommendation. Also, be sure to clear the clogged nozzle for smooth extrusions of enough filament.
Additionally, it would be helpful to have your extruder motor working well. A dysfunctional extruder motor impacts enough plastic extrusion.
Adjust Z-Offset
You can adjust the Z offset slowly while checking if the gapping issues have gone. Equally, you can conduct a test print as you keep adjusting the Z offset until the gapping problem disappears.
After, you can maintain the setting values at this particular point to keep getting the best results.
Additional ways of eliminating first layer 3D print gaps:
- BLTouch
- Use of tried and tested printer profiles
- Changing slicer settings
How Do You Hide the Seams on a 3D Printer?
There are two primary ways of dealing with Z seams or 3D print gaps. Firstly, you can prevent it by reversing the factors that cause seams. Notably, the visibility of the seam depends on different factors like the size and shape of a model.
Secondly, the best way of hiding 3D print seams remains the adjusting the slicer settings.
How to Fix Gaps in the Top Layers?
Top layers remain a vital component of any 3D print object. Gaps may appear in 3D prints because of different factors, including under extrusion issues and extruder skippings.
To fix gaps in the top layers, you can:
- Increase the number of top layers in your slicer settings
- Adjust print speed either faster or slower
- Check quality and filament diameter
- Correct any issues with printer mechanical issues
- Increase infill density
- Fix clogged nozzles
Conclusion
3D printing enthusiasts often face print gapping in their routine work. A fast or a slow printing speed, unsteady surface, and unexpected temperature changes cause gapping issues,
Equally, a clogged printer nozzle is a primary reason for 3D print gapping.
Fixing these challenges results in the elimination of 3D print gaps, leading to high-quality 3D objects.

Recommended Reading
3D Printer Extruder Clicking? Why It Does That?
3D printer extruder clicking is a common issue for 3D printers and can be caused by many different things. It could be an issue with the stepper motor...
PLA Not Sticking to PEI? Easy Fixes and Useful Guide!
PLA not sticking to PEI? Wel, the starting point is to have an effective first layer in your 3D prints. A proper bed adhesion on your 3D printer is a must!
What Is FDM 3D Printing?
Fused Deposition Modeling(FDM) and Fused Filament fabrications (FFF) are the same. The FDM or FFF uses additive manufacturing 3D printing technology.